Example: Residential Irrigation
This example illustrates a
simple residential irrigation system that can be controlled from a web browser.
Hardware
The system is constructed in a
resident with Internet access through a DSL modem. On one side, the DSL modem is connected to the telephone
line, and on the other, to a wireless router (here a LinkSys WRT54G). The wireless router allows the PCs and wireless devices to
share the Internet connection.
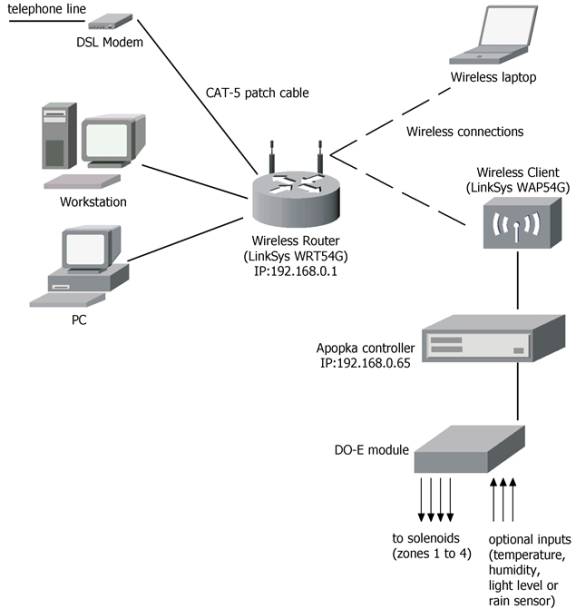
The wireless router contains a
firewall. It acts as the gateway
through which the devices share the Internet connection. The local intranet has private
addresses that are of the form 192.168.0.xxx, where the last octet denoted by
xxx uniquely determines the local host address. The gateway has address 192.168.0.1, and the Apopka
controller is given the address 192.168.0.65 (see Setup Controller Dialog).
The DO-E module has four outputs
that can directly switch 24V AC irrigation solenoid currents. Optionally, the DO-E can be connected
to a T/H-SP probe to read temperature and relative humidity and a T-SP1 to read
temperature. The analog input may
be used to read light level using a solar probe or an off-the-shelf rain gauge.
The Script
The irrigation system is
programmed to turn the four zones in succession for a specified amount of time,
twice a week on designated days.
The irrigation start times are programmable. Besides these two scheduled days, a third “special” schedule
is implemented. Moreover, each
zone is individually controlled to follow the automated schedule or to be
controlled manually in an over-ride mode.
The script is available here.
The parameters start
with the lower-case ‘p’. The
scheduled days are determined by pDay1, pDay2, and pDay3. These could be in the range of 1
through 7 (Sunday through Saturday) or any other value, say 0, to disable the
corresponding schedule. The
parameters pStart1, pStart2, and pStart3 denote the start times in minutes from
midnight. For instance, if the
irrigation is to start at 6 AM, then the corresponding start time (in minutes)
would be 360. Similarly, the
duration each zone is to be on for each of the schedules are stored by the
parameters pDxTy, where x (for 1, 2, or 3) denotes the schedule, and y (for 1,
2, 3, or 4) denotes the zone.
These durations are also in minutes. Finally, the parameter pManual is used for the over-ride
cases. This parameter is bit
encoded. The lower nibble (four
bits) are used to specify that the corresponding zone is to be turned on. The higher nibble (bits 4 to 7) are
used to specify that the corresponding zones are to be kept off. If neither the lower nibble bit, nor
the higher nibble bit is set, the corresponding zone will be controlled by the
schedules.
Browser Interface
The schedule may be set by
modifying the parameter values from the “Process
Dialog.” However, this is
approach is not as user-friendly as it could be. An alternative is to use a local HTML file to access the
controller and set the schedule.
The source of the web page is available here.
The web page uses the ActiveX
component iNetGrowX.ocx. It is
best viewed with the Windows Internet Explorer. The resultant web page is shown below.
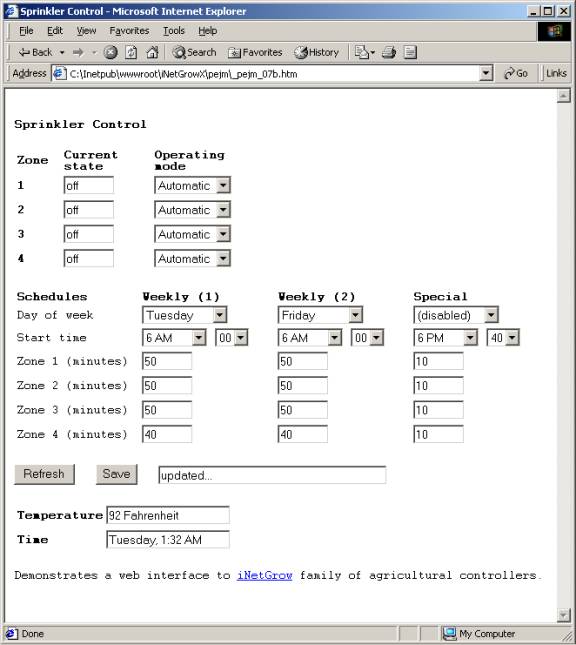
The
user may click on the “Refresh” button to view the current state of the system. The schedules may be modified using the
drop-down list boxes and then clicking the “Save” button.
Also see Automated Tasks, Script
Syntax, Using Parameters and Variables
![]()
© Rigel Corporation iNetGrow 2003-2006. All rights reserved.